

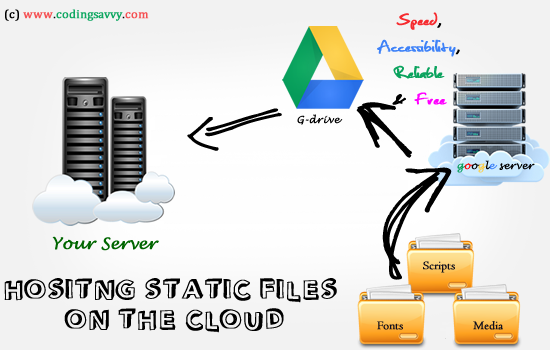
Many web-Admin / Web-masters always want a way of hosting static files externally on the web to save space,access it anywhere,multiple usage and so many other reasons.In the case of those using free blogging services such as Google blogger platform, It is difficult to put all source code and files in a single XML template files, It better to store the files somewhere safe in the cloud where you can always link to it as an external file,There are many cloud storage services but for the purpose of this tutorial we are going to use Google G-drive as our cloud storage platform because it is free and fast.
Why Google G-drive?
Everything that has an advantage also has a it disadvantages because Google G-drive is free it might not be the best choice but it a great way to start because Google is a well trusted company and their server respond very fast as fast as 2 seconds and they have a very good accessibility interface not to mention user friendly platform, There are some premium clod storage services out there you can try some of them.But what if we just need a free space to store our files then I will recommend G-drive it safe,fast,free and trusted.
How do I get a G-Drive account ?
If you have a Google account then you do not need any extra setups to get started but if you don't have an account with Google you need to visit http://drive.google.com or http://www.gmail.com to register.
Uploading Your static file into G-drive account
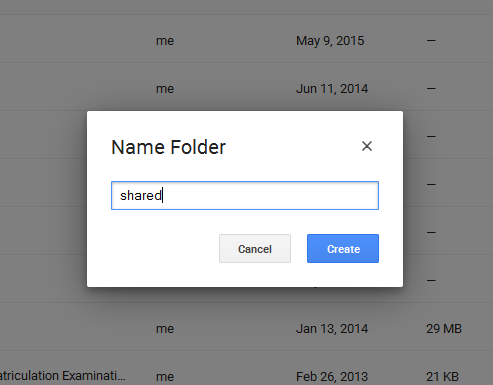
It very easy to get started with Google G-Drive, First you start by creating a new public folder
By clicking on the New and then selecting Folder from the drop down, For the purpose of this tutorial let name the new folder Shared .
Now that we have created a new folder, All folders in you G-drive account have private access by default if we want to upload a shareable file into this folder we need to make it access public so that we can access it from any server using the unique URL.
Making The folder public automatically makes all the file in this folder easy to share in face the whole folder itself is shareable but that's not what we are interested in for now.
another interesting thing about G-drive is that the link to the public files and folders are hard to guess, Only you and those you share or give the URL directly can have access to your public files.
To upload files on the drive we can upload files without creating a new folder the reason for creating the Shared folder we created earlier was to keep our files organized, Now double click on the newly created folder "Shared" to open it after the folder has opened you will see an empty folder asking you to drag items into it but That feature might no be supported by all browsers another way is to click the New button and select File Upload or File from the drop down the upload dialogue should pop into your screen by now giving an option to choose the files you want to upload to your drive after that click OK to begin upload.
Making G-Drive folder public
 Now that we have uploaded our files we need to make the folder public this can be done by right clicking on the folder and selecting Share from the drop down
a simple dialogue will display to give you the shareable URL to this folder but that is not what we need what we want to do is to make the folder public to the internet, That can be done by click on the Advance button on the right bottom side of the displayed dialogue
Then change the access control to Public and click Ok after the change.
Now that we have uploaded our files we need to make the folder public this can be done by right clicking on the folder and selecting Share from the drop down
a simple dialogue will display to give you the shareable URL to this folder but that is not what we need what we want to do is to make the folder public to the internet, That can be done by click on the Advance button on the right bottom side of the displayed dialogue
Then change the access control to Public and click Ok after the change.
How can I access my files on G-drive?
File accessibility is one of the key important feature if cloud services and file hosting,Google G-drive has a very good way of making files accessible, I also like the incredible server response time it quiet impressive.
Files can be accessed through a public link or a direct link , Direct link is a user-friendly way of accessing the public files but for what we want to archive in this tutorial we will have to convert the user friendly URL to direct link so that we can have access to the raw file content with no frames on it.
Steps to turn G-Drive shared public ink to direct file link
first of all open the folder that contain s the file, Now right click on the file and select Share from the drop down link, you will be given a shareable link but it might not be a public link to make sure it is a public link select the Advance button on the right bottom of the dialogue and set the Who has access to public and click Save, The you can copy the highlighted link shown below the Link to share label .
The link code should look similar to this:
https://drive.google.com/file/d/0B37VjHyKc3HPiHk5bjZUVXNHOTA/view?usp=sharing
The link shown ablove is just the user friendly link I talked about earlier, The link is cool to use when you are planning to give the file link to your friends or colleague but for our own case we need the file in it original format unframed so the it will be readable from anywhere we are linking to it, To do this all we need is the potion that is highlighted blue above, your link might look a bit different but there will always be a series of alpha-numeric characters in any link that is generated, Now copy those charters and put the in fron ot the link below:
https://googledrive.com/host/
To make it look like This :
https://googledrive.com/host/0B37VjHyKc3HPiHk5bjZUVXNHOTA
This is is exactly the link we need in our source codes to enable the browser and other server to have access to the raw contents of the file.
Look at this for instance:
<script src='https://googledrive.com/host/0B37VjHyKc3HPiHk5bjZUVXNHOTA' > </script>
<img src='https://googledrive.com/host/0B37VjHyKc3HPiHk5bjZUVXNHOTA' alt='me!' />
<img src='https://googledrive.com/host/0B37VjHyKc3HPiHk5bjZUVXNHOTA' alt='me!' />
Hosting font files on Google G-drive
The most common formats for other file can be linked to using the method above including media files and videos files but what if you want to link to a font file am not talking about Google font this time but am referring to you very own customized font files that is needed by our CSS file, This situation requires a different approach.The most common font formats are TOF or OFT , The web browser can not read his font format, we will need to convert the fonts to the browser readable formats. to convert the fonts yI normally use http://www.fontsquirrel.com/tools/webfont-generator check the legally eligible for web embedding box after the success of the upload click the Download your kit button, In the folder you've just downloaded we only need just 4 font formats in the folder which are .svg,.eot,.tff,.woff Now upload theses file into your G-drive using the procedure above and get the raw link just like I have explained above.
Note that you need to change the file access one after the other and get the link separately:
T use theses file in you CSS file use the method below :
@font-face {
font-family: 'My Font';
src: url('font-link-eot');
src: url('font-link-eot?#iefix') format('embedded-opentype'),
url('font-link-wof?') format('woff'),
url('font-link-ttf?') format('truetype'),
url('font-link-svg?#fontname') format('svg');
font-weight: normal;
font-style: normal;}
Note that the font name in front of
url('myfont.svg?#myfont') format('svg');
also NOTE that google G-drive link dose not need an extension so you can leave it as something like this:
url('https://googledrive.com/host/0B37VjHyKc3HPiHk5bjZUVXNHOTA?#myfont') format('svg');
You can now use the following font in your CSS file as above :
@font-face {
font-family: 'My Font';
src: url('font-link-eot');
src: url('font-link-eot?#iefix') format('embedded-opentype'),
url('font-link-wof?') format('woff'),
url('font-link-ttf?') format('truetype'),
url('font-link-svg?#fontname') format('svg');
font-weight: normal;
font-style: normal;}
#menu{
font-family:My Font ;
}
Thanks!
Your feedback helps us improve tutorials.
No comments:
Post a Comment